Data Sync Application - collect and store all the company's data in one place
1. Overview
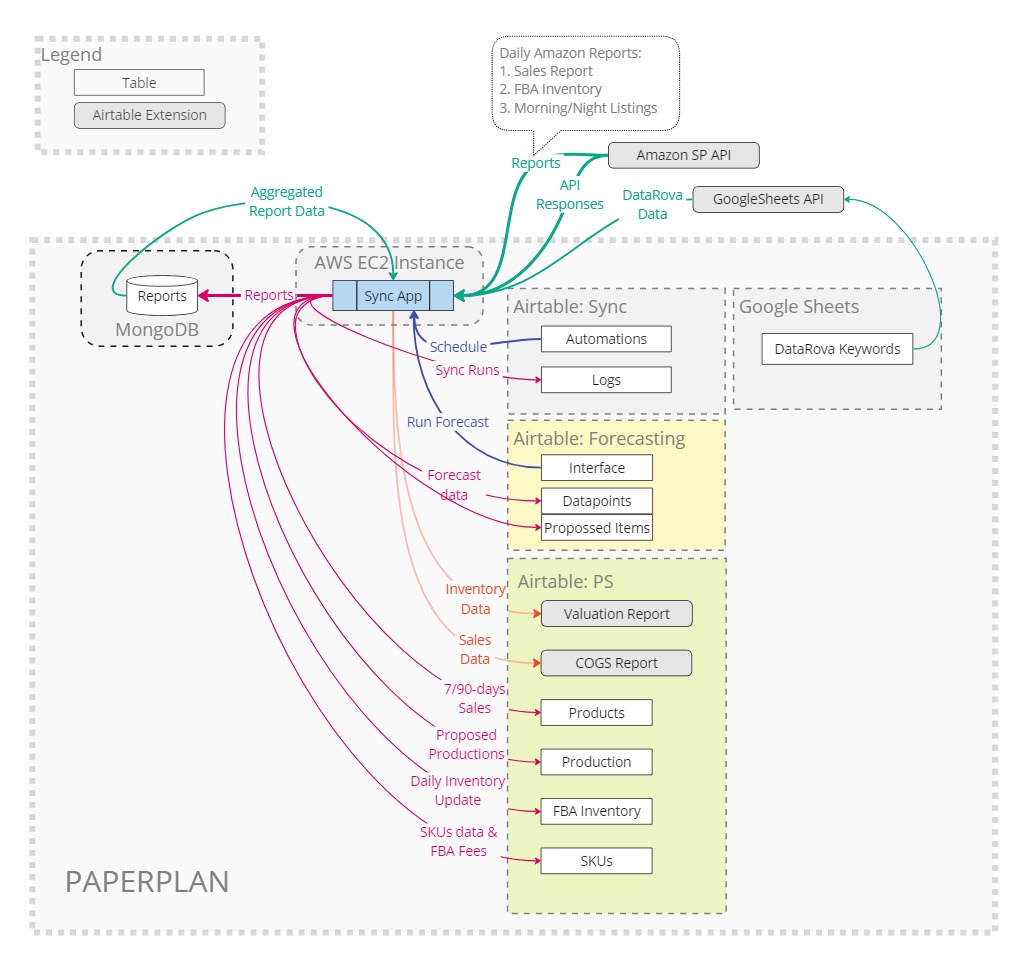
SYNC module is designed to fulfil regular scheduled synchronization tasks. The main goal of the Sync module is retrieving various business data from a set of APIs and saving it to the company's Airtable base or to MongoDB storage, but it can as well run other data handling tasks with supported APIs.
Below is chart depicting relevant Sync module connections and connected APIs.

2. Module Maintenance
The module is running in back-end continuously and doesn't require any maintenance unless an exception occurrs.
Alerts
Two types of alerts are posted to #airtable Slack channel:
- Sync application offline - the application or server is not running. In this case you can try the following steps: Data Sync Application - collect and store all the company's data in one place#3. Restart the Application, or contact the developer.
- Report <report_name> failed - the application is running but for some reason a specific report was not created during the last 24 hours. In this case you can try the following steps: Data Sync Application - collect and store all the company's data in one place#5. Repeat a failed report, or contact the developer.
Check if Sync module is OK and running
You can check the module's API availability by entering https://api.paperplan.co/api in your browser
- ✔if browser displays message "Hello world!", then the Sync application is currently running on the server
- ❌else, you'll have to restart the application: Data Sync Application - collect and store all the company's data in one place#3. Restart the Application
Check SYNC base in Airtable
Check SYNC→Overview table 
- Alive - if 1, then application is running OK
- Timestamp - updated every 30 minutes while application is running (GMT time)
Optionally, you can track the following Sync application activity in the SYNC base:
- SYNC→Logs - sync application logs
- SYNC→Reports - reports created by the Sync app, grouped by Report Type in reverse chronological order
Automations Schedule
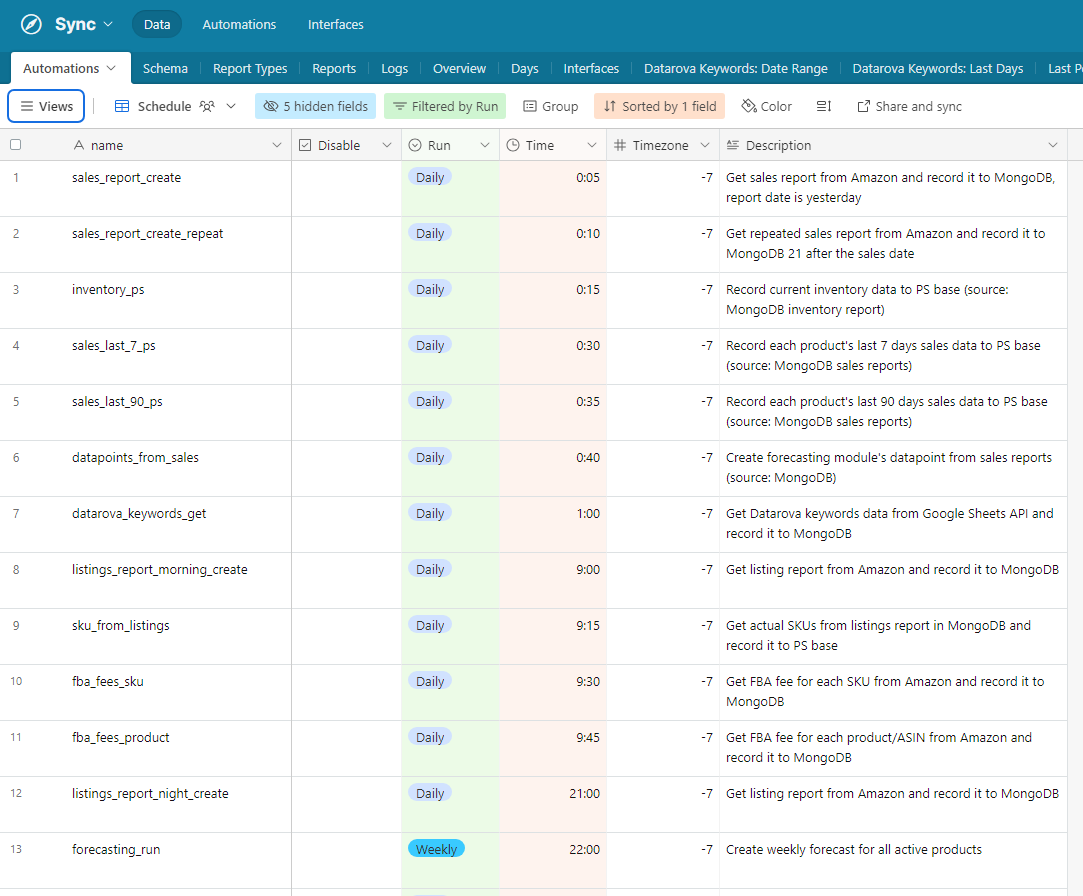
SYNC→Automations→Schedule - here you can see all the scheduled automations, the description and running time

- Time - time in 24h format
- Timezone - timezone offset from GMT, default is -7 hours (PDT)
- Run - frequency of runs Daily/Weekly/Interval
- when set to Interval, the automatically will be repeated periodically, using Time value as the period duration
- Disable - disable automation runs
Any updates will take effect during the following 2 minutes, a corresponding record will be made in the Logs table
3. Restart the Application
Step 1: Login to AWS console
Login to AWS console using AWS root login/pass
Step 2: Locate the server instance and connect to it
Go to AWS Console → EC2 → Instances → select the first instance → Connect
- make sure the instance's status is Running, otherwise you can start or reboot the instance from the menu dropdown "Actions" on top right
Step 3: Make sure no Sync application is running, stop the application if it is on
- Type the following command
pm2 list - The list of applications running on the server will be displayed
- If there is an application named "Sync", then type the following command:
pm2 delete <ID of application from the displayed application list>
Step 4: Start the application
Type the following commands one-by-one
cd paperplan/core
pm2 start dist/main.js -n 'sync'
Result
Now you can check the application's status as described here
If you're still encountering problems, contact the developer
4. Report types

In the Reports→Report Types view you can modify the following properties of the relevant report types:
- Status: Active/Inactive
- Real-time: if checked, it means this report type only contains the current state of data entries, and no historical data for a specific date can be received in it
- Offset: report date can be specified when requesting non-realtime reports. By default the date is today, but you can adjust the report's date offset using this field
- Notify On Fail: defines if an alert is fired when a report failed
- Repeat after N days: sets the number of days after which the report is repeatedly updated. Used for sales_report, as the orders' status may remain pending during 21 days after the purchase.
- Add to Datapoints: indicates that the data from this report is additionally store in datapoints, optimised for using in the Forecasting module. This setting should be modified only by the developer.
- Report Type Id: value used as identifier when requesting report data by API. Can be useful for detecting report's source in Amazon API documentation for example. This setting should be modified only by the developer.
5. Repeat a failed report
Step 1: Open the failed reports list
Open Reports→Failed Reports
You will see the list of the failed non-realtime reports.

Step 2: Clear the report's Last Updated field (if required)
There are following known fail scenarios:
- The report couldn't run on Airtable side: Last Updated field is empty
- The report was request by API didn't reply or returned an empty report: Last Updated and Mongo Id fields are empty
- in this case clear the Last Updated field of the report
- The repeated updates of the report failed: Update Repeated field is empty
Step 3: Uncheck the report's Fail field
The report will disappear from the list and will be run on the next scheduled time. If it fails again, a new alert will be fired.
6. Troubleshooting
In case of various bugs and errors, first of all check the following views to localize the issue.